![]()
Overview
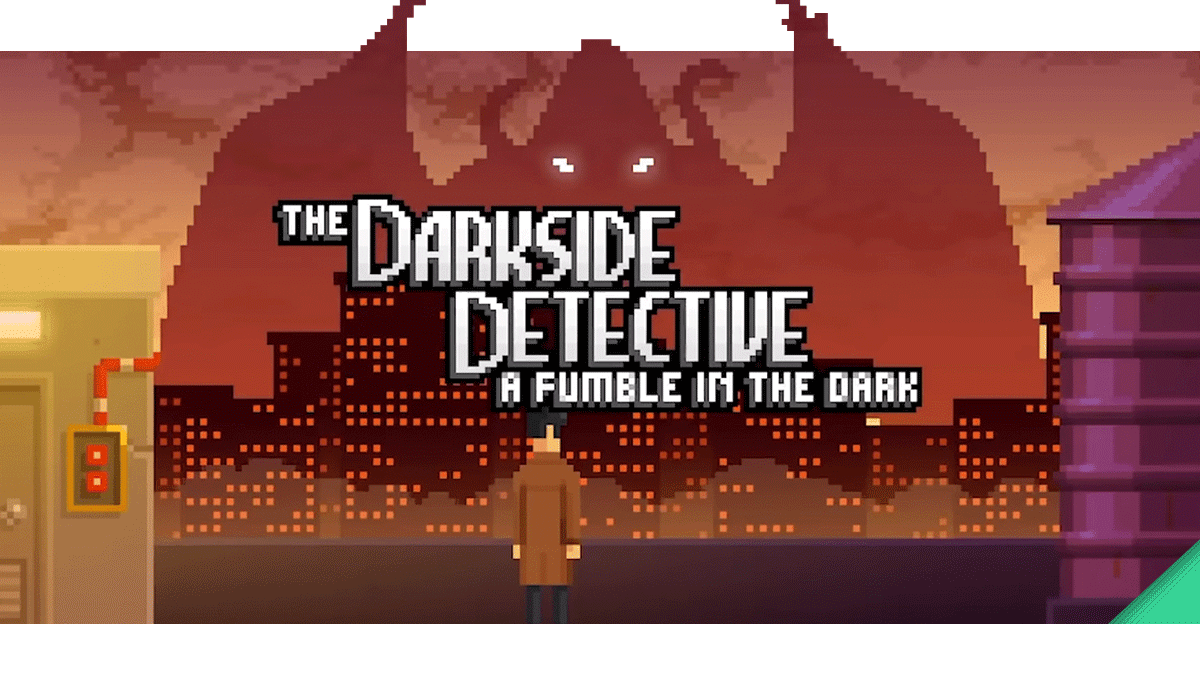
The Darkside Detective: A Fumble In The Dark
Release: April 15, 2021 | Developer: Spooky Doorway | Publisher: Akapura Games
![]() 1
1 ![]() 7
7 ![]() 8
8 ![]() 8
8
If this Guide for The Darkside Detective: A Fumble In The Dark helped you out, you can say thank you by buying me a coffee.
| ►Roadmap | ►Trophy Guide | ►YouTube Playlist |
| Difficulty: 2/10 | Time: 3 hours | Playthroughs: 1 |
| Online Trophies: | – |
| Missable Trophies: | – |
| Story/Unmissable Trophies: | You Answered The Call • Two Days To Retirement • The Luck Of The Irish • Sircus Survivor • Tag Team Champs • High School Graduates • Death’s Door, Left Ajar • Thunderstruck • Cryptkeeper |
| Collectible Related: | Heavy Petting • Light Reader • Time Cop |
| Chapter Specific: | An Eye For Detail • Wisdom Seeker • Busy Body • Resource Hogs • Teach An Old Dog New Tricks • Well Well Well… • Bum Ride • Unwanted Dinner Guest • Playing With Fire • Matchmaker • Slender Fan • Too Cool For School • The Boys Are Back • Kind Words • The Grump Of Christmas Passed • Beautiful Nerd • Even Lighter Reader |
| Difficulty Specific: | – |
| Buggy Trophies: | – |
| Time Limited: | – |
Roadmap
Step 1 – Play through the 6 Cases and collect and do everything in one run
Nothing is missable! You can replay every case as often you want. You don’t need to collect anything in one run, but it’s recommended. If you miss an object, you can come back, collect the object and exit the case after saving. You don’t have to replay the whole case. Below you will find an overview of all cases and the related trophies. Click on the trophy to jump to a certain part and get more information.
Step 2 – Poke Detective McQueen 50 times
Of course, you can do this early and in any case, you want. Just click 50 times on Detective McQueen (yourself, the main character) and you will unlock the last trophy and the platinum trophy as well.
Step 3 – Complete the Bonus Case 7+8+9 to get 100%
On December 24, 2021 we got a free DLC Update with a new Case 7: Ghosts Of Christmas Passed. Jump right here to see the walkthrough for Case 7: Ghosts Of Christmas Passed.
On April 15, 2022 we got a free DLC Update with a new Case 8: One Flew Into The Cuckoo’s Nest. Jump right here to see the walkthrough for Case 8: One Flew Into The Cuckoo’s Nest.
On October 27, 2022 we got a free DLC Update with a new Case 9: Tales from the Darkside. Jump right here to see the walkthrough for Case 9: Tales from the Darkside.
Trophy Guide
Full Game 100% Platinum Walkthrough Video Guide
 |
Season 2 Complete Unlock all The Darkside Detective Season: A Fumble in the Dark trophies |
|---|
 |
You Answered The Call Complete Case 1: Missing, Presumed Darkside |
|
|---|---|---|
| Story Unmissable | ||
| ► You will unlock this trophy by closing Case 1: Missing, Presumed Darkside.
You will find a complete walkthrough in the spoiler below.
Walkthrough
TV Station
Stage
Corridor
Dressing Room
Corridor
Reception
Carpark
Reception
Dressing Room
Stage
Storage Room
Carpark
Switchboard
Street
Switchboard Inside
Switchboard Roof
Street
Office
Switchboard Inside
Switchboard Roof
Street
Auction House
Street
Showroom
Bidding Room
Street
Junkyard
Street
Junk Piles
Machinery
Junk Piles
Street
Pier 13
Wharf
Bazar left
Bazar right
Alleyway
Back Of Shop
Alleyway
Bazar right
Auction House
Street
Bidding Room
Backstage
TV Studio Carpark
Reception
Carpark
Reception
Corridor
Editing Room
Corridor
Dressing Room
Pier 13
Wharf
Back Of Shop
Bazar left
Junkyard
Street
Machinery
Office
Switchboard
Street
Office
Auction House
Street
Bidding Room
Switchboard
Street
Switchboard Inside
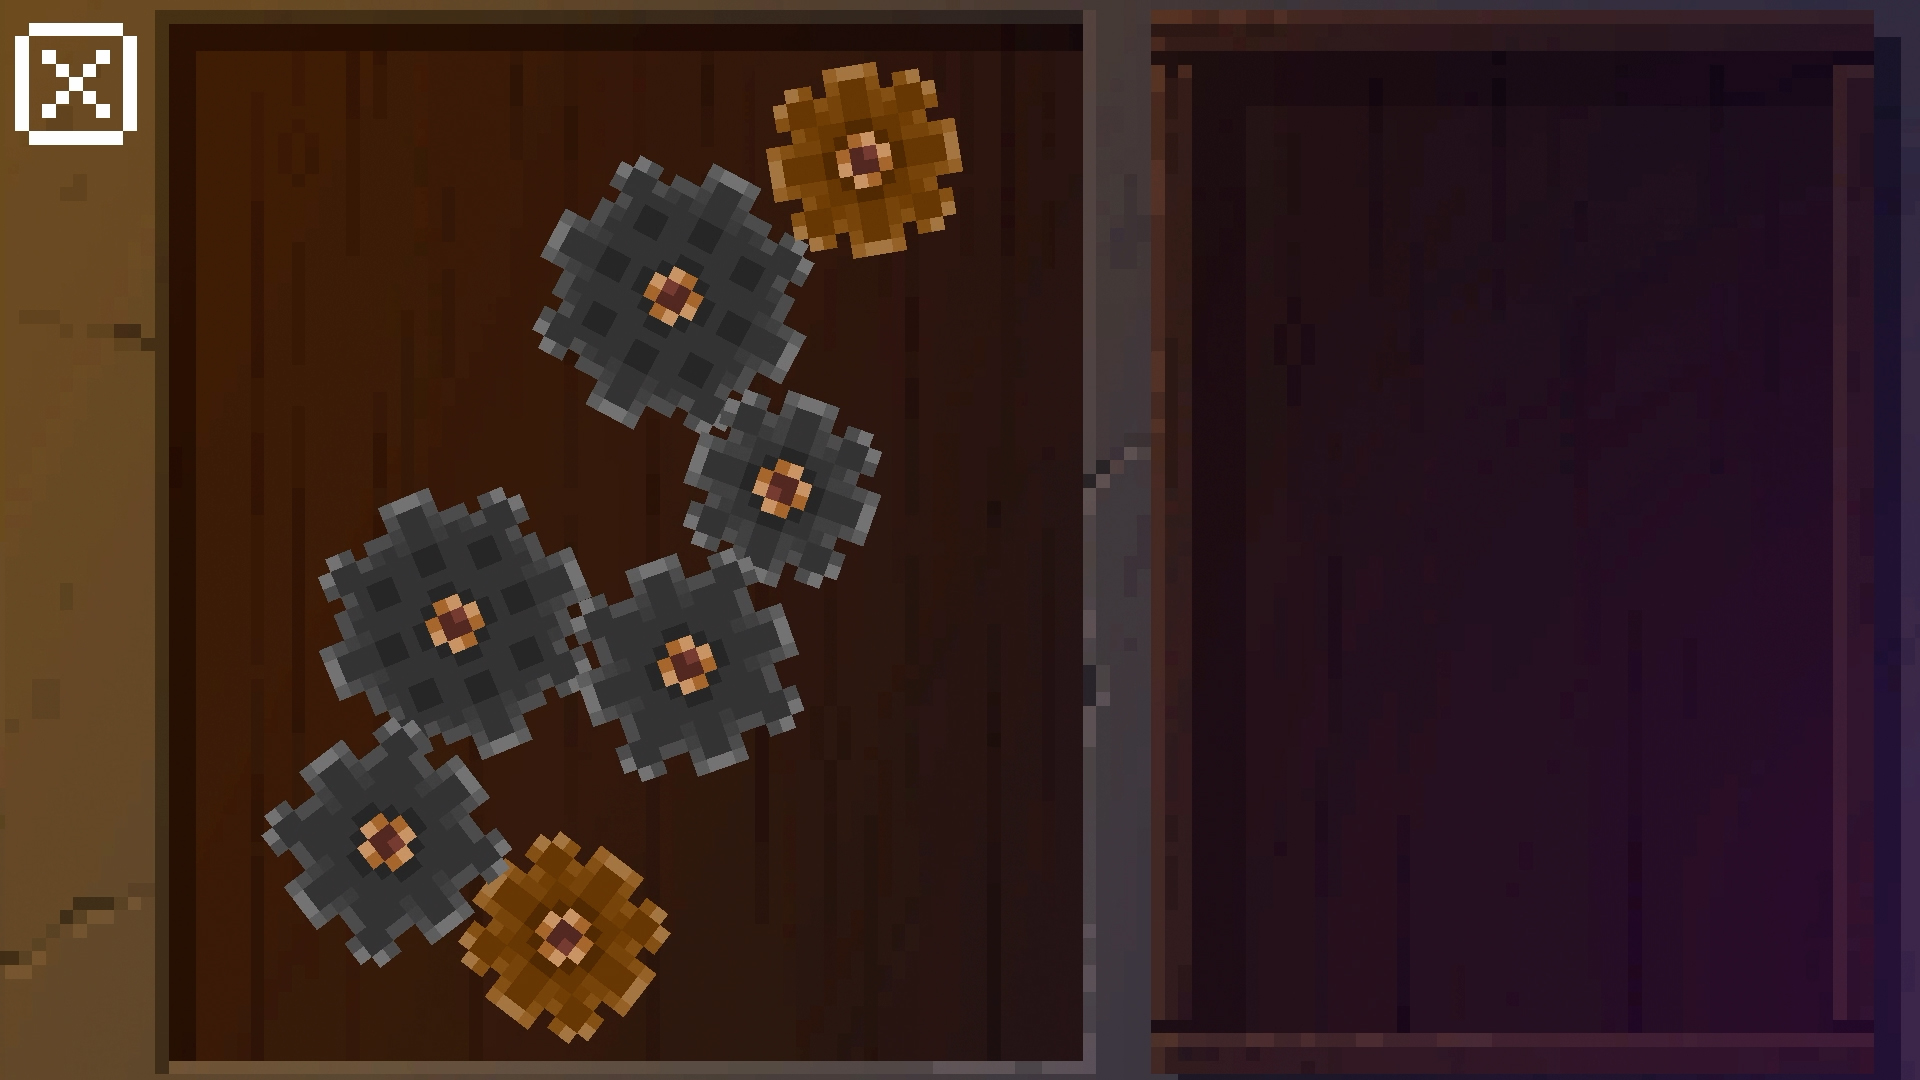
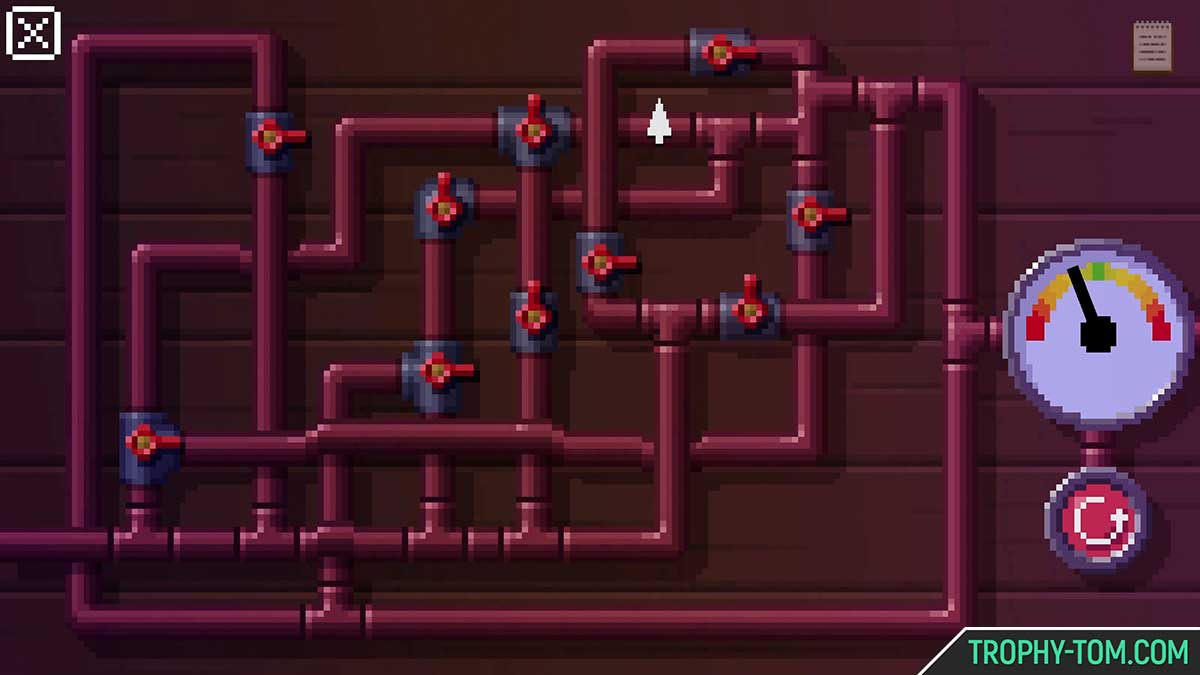
Telephone Number Puzzle There are multiple Glyphs you can call. You need to reconnect the wires so they look like the glyph on the left side of the screen. The glyph to call Dooley is the last one. The 5 other glyphs are not necessary to proceed. I will describe the solution of the last Glyph. The first Number is the start number where you need to pick up the wire and the second number is the end number where you need to put the wire in. Reset the Connectors so you start with the same constellation.
|
||

 |
Two Days To Retirement Complete Case 2: Twilight Years |
|
|---|---|---|
| Story Unmissable | ||
| ► You will unlock this trophy by closing Case 2: Twilight Years.
You will find a complete walkthrough in the spoiler below.
Walkthrough
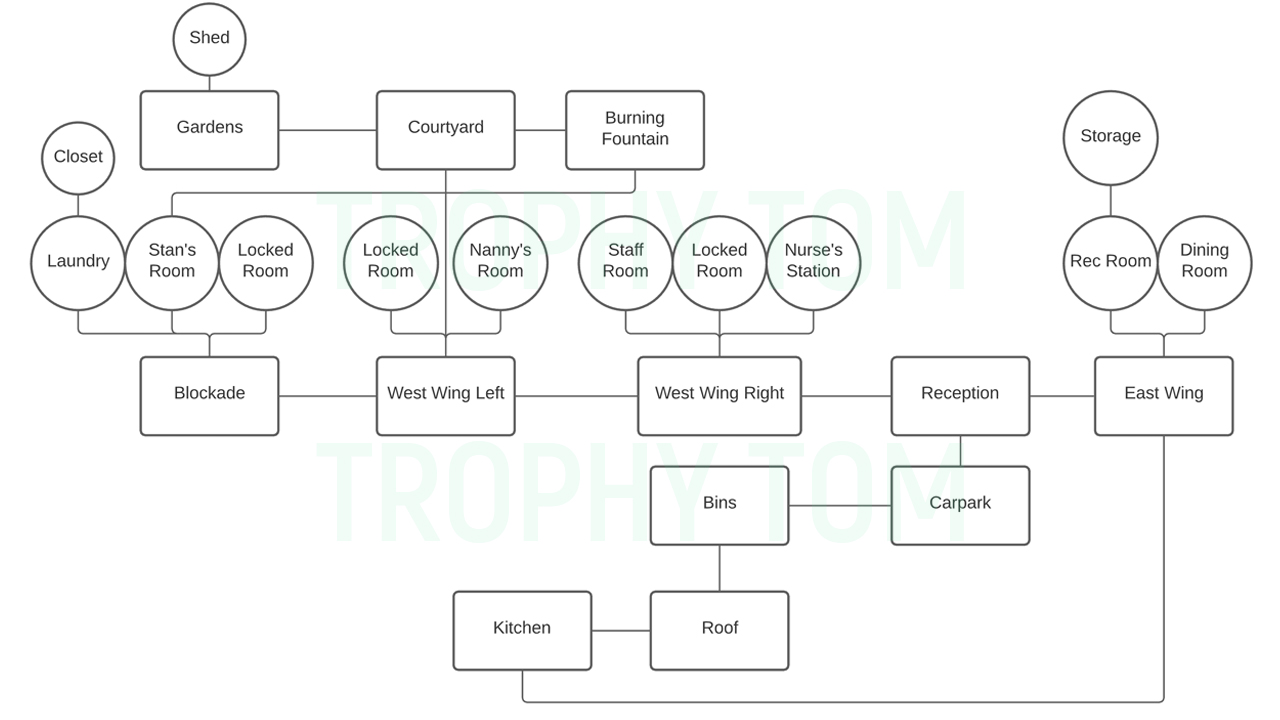
Outside / Carpark
Reception
West Wing Right
West Wing Left
Reception
Carpark
Bins
Roof
Bins
Kitchen
Shed
Burning Fountain (More Courtyard)
Laundry
Reception
Rec Room
Dining Room
Nurse’s Station
Carpark
Roof
Dining Room
Rec Room
Storage
Nanny’s Room
Burning Fountain
Stan’s Bedroom
Laundry
Closet
Bins
Nanny’s Room
Staff Room
Laundry
Rec Room
Roof
Gardens
This will close the case and unlock the trophy. |
||
 |
The Luck Of The Irish Complete Case 3: Druid’s Delight |
|
|---|---|---|
| Story Unmissable | ||
| ► You will unlock this trophy by closing Case 3: Druid’s Delight.
You will find a complete walkthrough in the spoiler below.
Walkthrough
Docks Area
Docks
Boat
Docks
Caravan
Docks
Pub Outside
Pub Inside
Caravan
Docks
Behind Caravan
Docks
Pub Inside
Docks
Behind Caravan
Caravan
Pub Inside
Pub Outside
Castle Area
Castle In the Distance
Castle Front Door
Grove Outside
Grove Inside
Grove Outside
Icehouse Outside
Gardens
Grove Outside
Castle Front Door
Garden
Greenhouse
Icehouse Outside
Icehouse Inside
Grove Inside
Castle Front Door
Castle Lobby
Landing
Upstairs right Bedroom
Ensuite/Bathroom
Landing
Attic
Dollhouse
Lobby
Kitchen
Larder
Dining Room
Now you need to find the 4 portraits in the castle and match them with the 4 real statues in the Dining Room to find the 1 fake statue. After finding one portrait come back to the Dining Room and examine the matching statue. After that, you can find the next portrait.
Statue Puzzle Overview:
Statue Puzzle Walkthrough:
Dining and Drawing Room Hallway
Dining Room
Drawing Room
Dining Room
Lobby
Dining Room
Landing
Dining Room
Statue Puzzle Walkthrough End
Grove Inside
Upstairs right Bedroom
Icehouse Outside
Drawing Room
Gardens
Drawing Room
Secret Chamber
Secret Room
Icehouse Outside
Attic
Roof
This will close the case and unlock the trophy. |
||
 |
Sircus Survivor Complete Case 4: Funfair Dismissal |
|
|---|---|---|
| Story Unmissable | ||
| ► You will unlock this trophy by closing Case 4: Funfair Dismissal.
You will find a complete walkthrough in the spoiler below.
Walkthrough
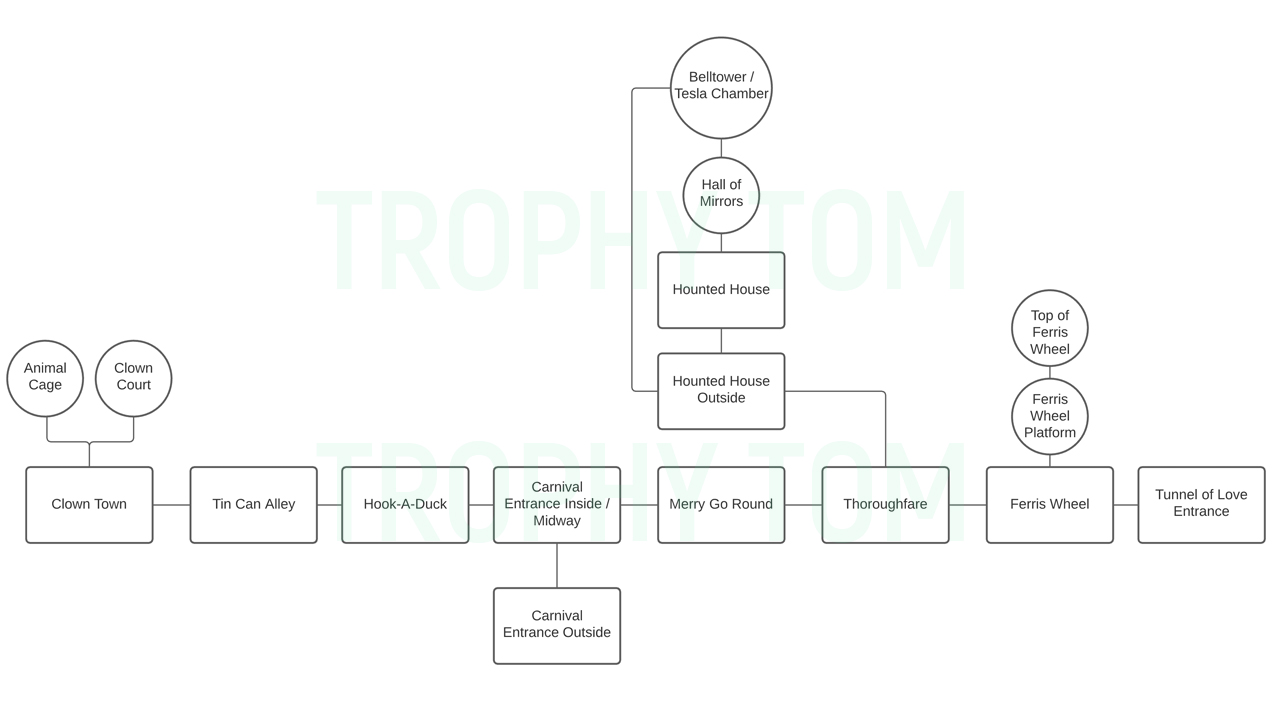
(Click to Enlarge) Carnival Entrance Outside
Carnival Entrance Inside / Midway
Tin Can Alley
Clown Town
Animal Cages
Clown Town
Clown Court
Hook-A-Duck
Clown Court
Clown Town
Carnival Entrance Inside / Midway
Merry Go Round / Horse Carousel
Animal Cages
Thoroughfare / Cotton Candy Stall
Haunted House Outside
Haunted House Inside
Hall Of Mirrors
Haunted House Inside
Hall Of Mirrors
Belltower / Tesla Chamber
Ferris Wheel
Ferris Wheel Platform
Top of Ferris Wheel
Tunnel Of Love Entrance
Hook-A-Duck
Tunnel Of Love Entrance
Belltower / Tesla Chamber
Game Show Stage
High Striker Screen
Carnival Sign Screen
Box Underwater Screen
Fish Belly Lab
Hacking Game The enemies will take 2 steps to make a 180 degrees rotation. At some points you have to take a step further and then a step back, to stay at the same point but the enemies will move further. If you miss a step or get caught the game will not reset to its original state and the following steps will not work anymore.
Video Screen Wall
This will close the case and unlock the trophy. |
||
 |
Tag Team Champs Complete Case 5: Royal Fumble |
|
|---|---|---|
| Story Unmissable | ||
| ► You will unlock this trophy by closing Case 5: Royal Fumble.
You will find a complete walkthrough in the spoiler below.
Walkthrough
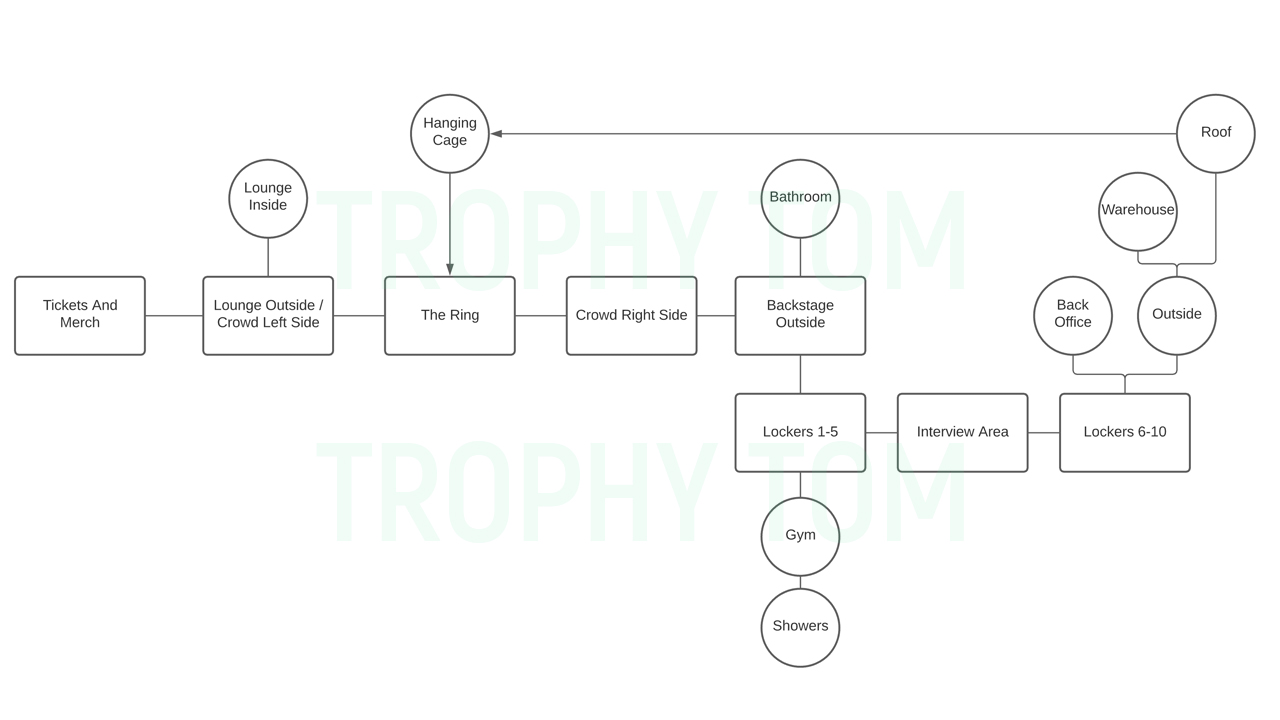
(Click to enlarge) Tickets And Merch
Lounge Outside / Crowd
Lounge Inside
Lounge Outside / Crowd
The Ring
Tickets And Merch
Crowd Right Side
The Ring
Backstage Outside
Lounge Inside
Backstage Outside
Lockers 1-5
Interview Area
Lockers 6-10
Back Office
Crowd Right Side
Lockers 1-5
Gym
Showers
Back Office
Lockers 1-5
Lockers 6-10
Outside
Warehouse
Backstage Outside
Bathroom
Lockers 6-10
Back Office
Outside
Warehouse
Gym
Outside
Back Office
The Ring
Outside
Roof
Hanging Cage
The Ring
Back Office
This will close the case and unlock the trophy. |
||
 |
High School Graduates Complete Case 6: Class of the Titans |
|
|---|---|---|
| Story Unmissable | ||
| ► You will unlock this trophy by closing Case 6: Class of the Titans.
You will find a complete walkthrough in the spoiler below.
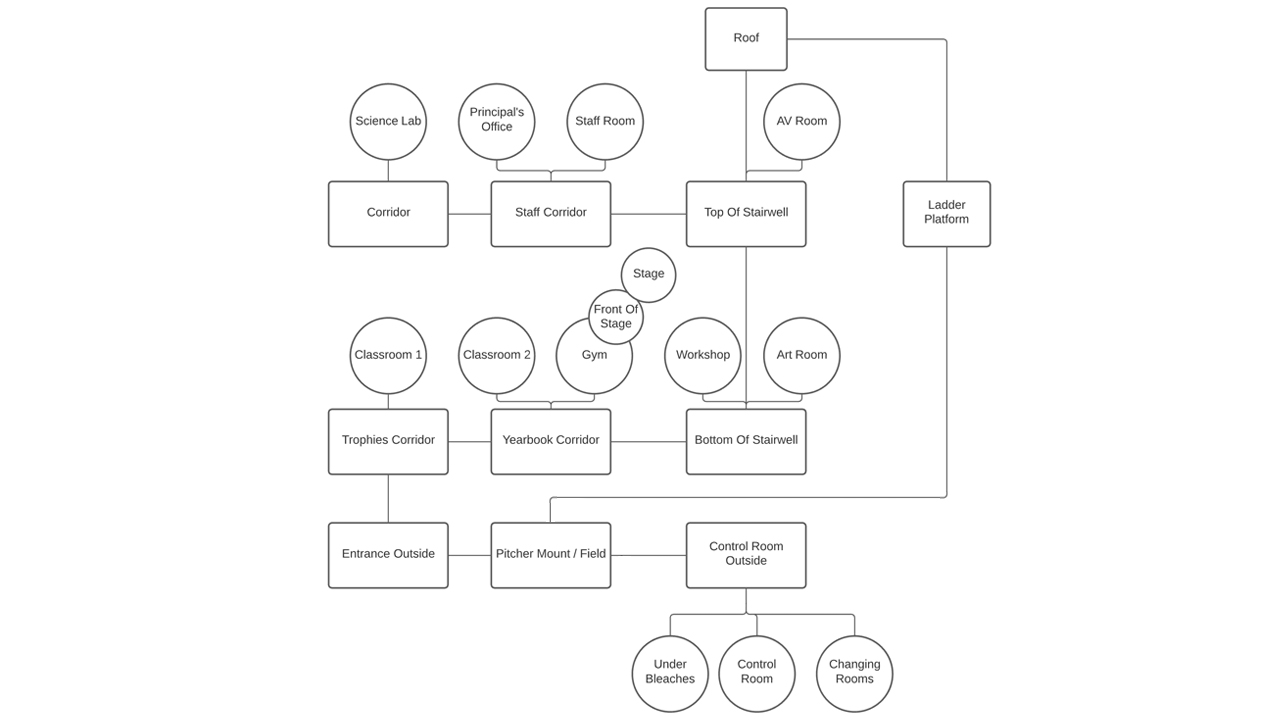
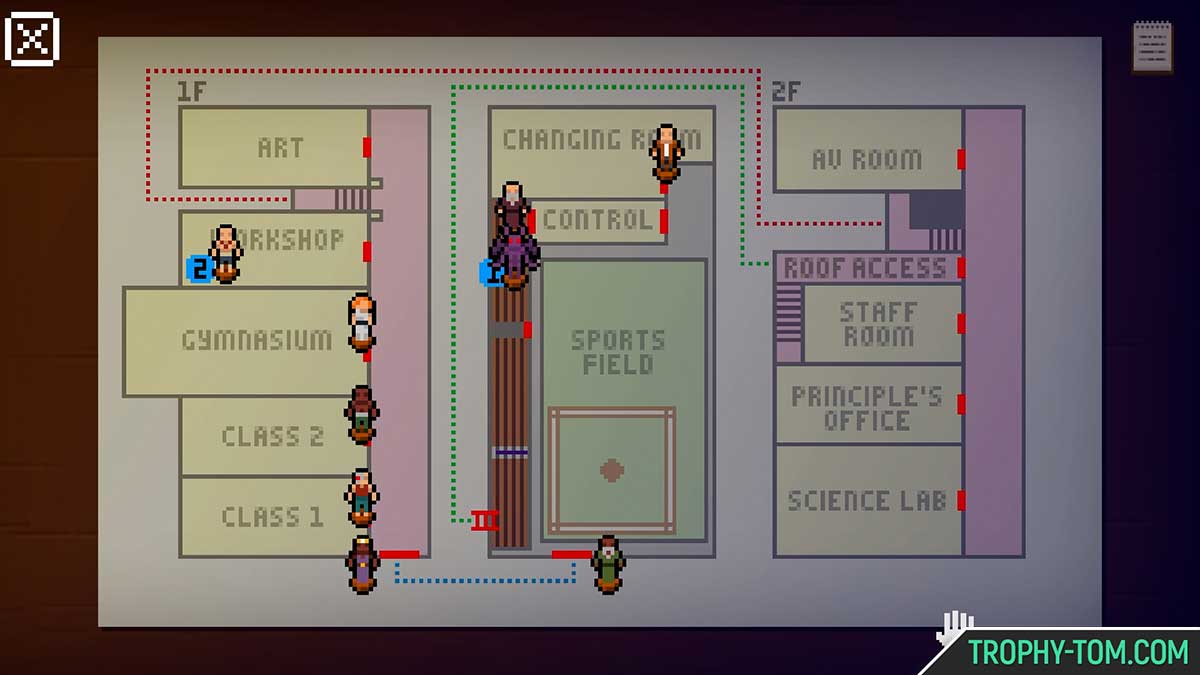
Walkthrough
Gym
In Front Of The Stage
Gym
Roof
Fire Escape Platform
In Front Of The Stage
Workshop
Staff Room
Science Lab
Under Bleachers
Changing Rooms
In Front Of The Stage
Staff Room
On the Stage
Under Bleachers
Control Room
Pitcher Mound
Top Of Stairwell
AV Room
Pitcher Mound
Under Bleachers
Bottom of Stairwell
Art Room
Control Room
Roof
Gym
Yearbook Corridor
Roof
AV Room
Gym
Science Lab
Staff Corridor
Principal’s Office
Workshop
Yearbook Corridor
Classroom 2
Staff Room
Trophies Corridor
Classroom 1
Trophies Corridor
Roof
Science Lab
Science Lab Corridor
Staff Corridor
Roof
Principal’s Office
Changing Rooms
Staff Corridor
In Front Of The Stage
On the Stage
Pitcher Mound / Field
Ladder Platform
Workshop
Under Bleachers
This will close the case and unlock the trophy. Watch the Credits until the end to unlock |
||

 |
Bum Ride Break the clown car. |
|
|---|---|---|
| Chapter Specific | ||
| ► Case 4: Funfair Dismissal – After driving the Clown Car to the Broken Elephant you have to use the Circuitry on Broken Elephant and the Jump Lead on Clown Car. Now click on the Clown Car and the Broken Elephant will move. After that click on the Clown Car again and the car will break and the trophy will unlock.
See |
||

 |
An Eye For Detail Spot what Gary was up to on the switchboard roof. |
|
|---|---|---|
| Chapter Specific | ||
| ► Case 1: Missing, Presumed Darkside – After reaching the switchboard area go directly to the roof of the switchboard and you will unlock the trophy. Just make sure you go to the roof before you use the Crime Scene Tape on Switchboard Entrance, this will miss the trophy.
See |
||
 |
Unwanted Dinner Guest Interrupt a scary, yet romantic, dinner. |
|
|---|---|---|
| Chapter Specific | ||
► Case 4: Funfair Dismissal – When you enter the Hall of Mirrors in the Haunted House, take this route:
Note: Do this before entering the belltower/ Tesla’s chamber. After finding the belltower you will not be able to take this route.
See |
||

 |
Busy Body Examine all of Nanny Dooley’s stash. |
|
|---|---|---|
| Collectible | ||
| ► Case 2: Twilight Years – Once you get access to Nanny’s Room, interact with all items:
See |
||
 |
Well Well Well… Discover the well’s secret… |
|
|---|---|---|
| Chapter Specific | ||
| ► Case 3: Druid’s Delight – After finding the secret room and starting the launch sequence, you have to go back to the well and take the crank back. You will see smoke coming out of the well. Examine Loose Rock Base at the well, to enter it and unlock the trophy.
See |
||
 |
Matchmaker Help find true love. |
|
|---|---|---|
| Chapter Specific | ||
| ► Case 5: Royal Fumble – After getting the Overgiver’s real name from the list from the Filing Cabinet in the Back Office, leave to go to Lockers 5-10. The Wrestlers and the Mongoose (Part of
See |
||
 |
Playing With Fire Ruin the demon’s downtime. |
|
|---|---|---|
| Chapter Specific | ||
| ► Case 5: Royal Fumble – Once you put the Disguise together and get access to Backstage, Move Right to the Interview Area. Click 5 times on the Demon and the trophy will unlock.
See |
||

 |
Too Cool For School Is Dooley a cool cat? |
|
|---|---|---|
| Chapter Specific | ||
| ► Case 6: Class of the Titans – After your encounter with The Monster on the Roof, make your way down the fire escape and go to the stairs in the school building. From there you can enter the Workshop. Examine the poster on the wall on the left side to unlock the trophy.
See |
||
 |
Wisdom Seeker Ask the masters for their worldy wisdom. |
|
|---|---|---|
| Chapter Specific | ||
| ► Case 1: Missing, Presumed Darkside – Go to Pier 13 on your map (the location will appear on the map after combining Sketchy Address with Manifest). At the Wharf go through the door to the Black Market.
Talk to the Mechanical Clairvoyant; it should give you a random fortune. Keep talking to it until you get all three.
Talk to the Cookie Jar next to it; it should also give you a random fortune. Keep talking to it until you get all six.
After hearing the 3 fortune from the Mechanical Clairvoyant and the 6 fortune from the Cookie Jar the trophy will unlock.
See |
||
 |
Teach An Old Dog New Tricks Teach an old dog a trick – was that not clear? |
|
|---|---|---|
| Chapter Specific | ||
| ► Case 3: Druid’s Delight – Castle Area – Go Left Until you get to the Front of the Icehouse. Examine Loose Rock Base to receive a Rock. Go right until you get back to the Gardens. Use the Rock on the Apples to receive apples. Go back left to the Druid’s Grove and give the Apples to the Dog to unlock the trophy. Do this before you slice the Apples. You can’t give the dog the sliced apples!
See |
||
 |
Slender Fan Listen to all Inhuman League tracks. |
|
|---|---|---|
| Chapter Specific | ||
| ► Case 6: Class of the Titans –
There is a band on the Stage in the Gym that will sing 3 different songs throughout the case. You need to make sure you click on the band every time they change songs. There are some triggers in the case that will lead the band to play the next song:
1. At the beginning of the case, Go directly right. Examine The Inhuman League Band. DO NOT click on Professor Timeloop first.
See |
||
 |
Manhandler Poke McQueen 50 times. |
|
|---|---|---|
| ► You can do this in any case you want. Click 50 times on Detective McQueen (yourself, the main character) and the trophy will unlock. | ||
 |
Resource Hogs Drain Nanny’s supply of sandwiches and tea. |
|
|---|---|---|
| Chapter Specific | ||
| ► Case 2: Twilight Years – Once you get access to Nanny’s Room, she will give you 2 Cups Of Tea and 2 Sandwiches. Leave the room through one of the two doors and re-enter the room. She will give you another two of each. Repeat this process until you have 30 Cups Of Tea and 30 Sandwiches in your inventory to unlock the trophy.
See |
||
Free DLC Case 7: Ghosts Of Christmas Passed
 |
Kind Words Find encouragement in the most unlikely of places. |
|
|---|---|---|
| Chapter Specific | ||
► At the very end of the Case, in the Back Office where you can fix the Display Machine, enter “YES”, “YOU” & “CAN”.
Note: Do this before entering 324 or you will miss this trophy and you have to replay the whole case! See |
||
 |
The Grump Of Christmas Passed What a nice night for some star gazing. |
|
|---|---|---|
| Chapter Specific | ||
| ► After fixing the Drum go back to the Violet Rift – Recent History, then go to the Roof of the Switchboard and examine the Telescope to unlock the Trophy. See |
||
 |
Death’s Door, Left Ajar Completed Case 7: Ghosts Of Christmas Passed |
|
|---|---|---|
| Story Unmissable | ||
| ► You will unlock this trophy by closing Case 7: Ghosts Of Christmas Passed.
You will find a complete walkthrough in the spoiler below.
Walkthrough
Outside
Inside
Outside
Pier 13
Inside
Switchboard
Ruin
Reception
Outside
Reception
Outside
Rift Hub
Orange Rift – Prehistoric Era In Front of the Hill
On Top Of The Hill – Standing Stone
In Front of Tomb
Rift Hub
Red Rift – Jurassic Era In Front of the Hill
Swamp Lands
In Front of the Hill
Rift Hub
Yellow Rift – Turn Of The First Millenium In Front of the Hill
On Top Of The Hill – In Front of the Boat
In Front of the Hill
Rift Hub
Green Rift – Puritan Times In Front of the Hill
Rift Hub
Indigo Rift – Gilded Era In Front of the Hill
Rift Hub
Violet Rift – Recent History In Front of the Hill
Inside the Switchboard
Rift Hub
Red Rift – Jurassic Era In Front of the Hill
Dinosaur Graveyard
In Front of the Hill
Swamp Lands
Yellow Rift – Turn Of The First Millenium In Front of the Hill
On Top Of The Hill – In Front of the Boat
In Front of the Hill
Rift Hub
Violet Rift – Recent History In Front of the Hill
Inside the Switchboard
The Roof of the Switchboard
Inside the Switchboard
Green Rift – Puritan Times In Front of the Hill
On Top of the Hill
Indigo Rift – Gilded Era In Front of the Hill
Red Rift – Jurassic Era In Front of the Hill
Orange Rift – Prehistoric Era In Front of the Hill
Back Office
This will close the case and unlock the trophy. |
||
Free DLC Case 8: One Flew Into The Cuckoo’s Nest
 |
Thunderstruck Complete Case 8: One Flew Into The Cuckoo’s Nest |
|
|---|---|---|
| Story Unmissable | ||
| ► You will unlock this trophy by closing Case 8: One Flew Into The Cuckoo’s Nest.
You will find a complete walkthrough in the spoiler below.
Walkthrough
Palm House
Hiking Trail
Back Path
Top of Tree
Rooftop
Side
Hiking Trail
Gate Outside
Gate Inside
Gate Outside
Rose Garden
Sewers
Generator Room
Botanic House: Entrance
Botanic House: Palm Trees
Generator Room
Rooftops
Botanic House: Palm Trees
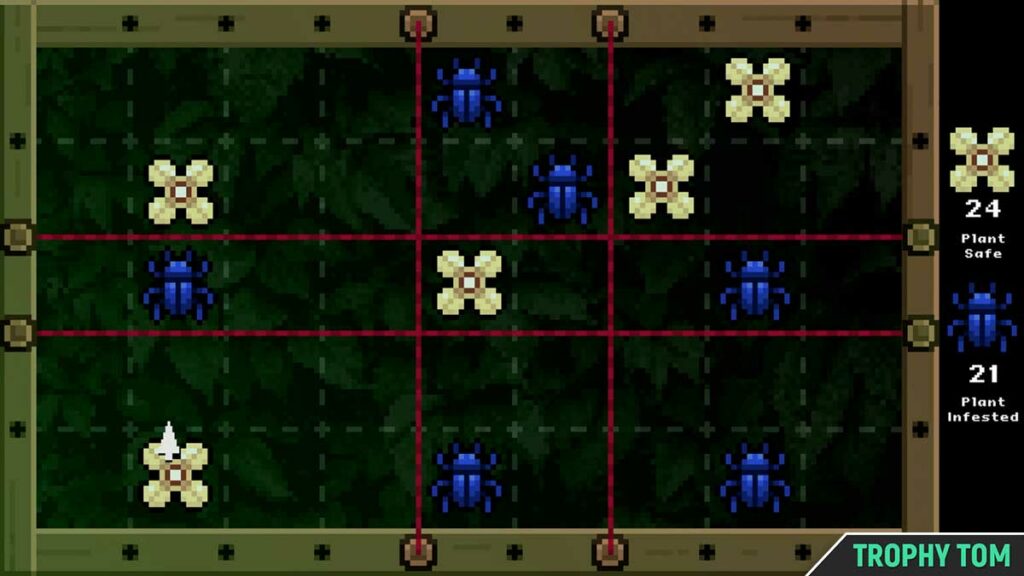
Plant Saving Mini-Game
Botanic House: Palm Trees
Rooftops
This will close the case and unlock the trophy. |
||
 |
Beautiful Nerd Always read the plaque. |
|
|---|---|---|
| Chapter Specific | ||
| ► You will unlock this trophy by reading all 10 Signs during Case 8. See Thunderstruck for a complete Walkthrough. You can find a list of all 10 Plaques here:
|
||
Free DLC Case 9: Tales from the Darkside
 |
Cryptkeeper Complete Case 9: Tales from the Darkside |
|
|---|---|---|
| Story Unmissable | ||
| ► You will unlock this trophy by closing Case 9: Tales from the Darkside.
You will find a complete walkthrough in the spoiler below.
Walkthrough 1 Field of Screams Dugout
Field
Stands
Parking
Field
Indoor Left
Indoors Right
Field
Indoors Left
Changing Rooms
Indoors Right
Storage
Stands
Parking
Changing Rooms
Indoors Right
Sluice Canal
Fields
2 Scourface Interrogation Cell
Reception
Docks
Warehouse Container Room
Warehouse Portal Room
Warehouse Container Room
Warehouse Portal Room
Beach/Portal
Tiki Bar
Beach/Portal
Factory – Audio Booth Room
Factory – Portal Room
Factory – Audio Booth Room
Factory – Portal Room
3 The Phisher King Laptop UI
Cafe
Street
Cafe
Street
Computer Lab
WWW – Login Lobby
Computer Lab
Cafe
Laptop UI
Cafe
WWW – Login Lobby
WWW – CPU
WWW – Front Side Bus
WWW – BIOS
WWW – Front Side Bus
WWW – Hard Disk Drive
WWW – Front Side Bus
WWW – Hard Disk Drive
WWW – Front Side Bus
WWW – RAM Access Bridge
WWW – RAM Memory Core
WWW – BIOS
CPU
Computer Lab
This will close the case and unlock the trophy. |
||

 |
Even Lighter Reader Find the pop-up image in each vignette. |
|
|---|---|---|
| Chapter Specific | ||
► You will unlock this trophy by finding all 3 images during Case 9. See Cryptkeeper for a complete Walkthrough. You can find a list of all 3 Images here:
|
||